Key Terms
Fact Sheet
Fact Sheet
Fact Sheet
100
Strong verbal and written communication skills are crucial in most jobs. Focus on improving your ability to articulate ideas clearly, listen actively, and write effectively.
Communication
100
How do you make sanitizer and detergent?
Making Detergent
- Green Bucket= Detergent Solution
- Pour one cap of detergent into the bucket
- Fill with water to the number 4
- Test with a testing strip
Making Sanitizer
- Red Bucket= Sanitizer Solution
- Pour 1 cap of detergent into the bucket
- Fill with water to the number 4
- Test with a testing strip
100
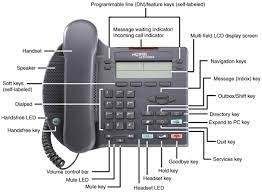
What are the different parts of a desk phone?
100
What are the reasons for returning/exchanging?
Return:
Change of Mind:
- If the customer simply changed their mind about the purchase and wants a refund, they would choose a return. This could be due to factors like a different preference or realizing the product doesn't meet their needs.
Dissatisfaction:
- If the customer is dissatisfied with the product or service and does not want a replacement, they may choose to return the item for a refund.
Size or Fit Issues:
- In cases where the size or fit of a clothing item or accessory is not suitable, a customer may opt for a return if they do not want an exchange for a different size.
Unsatisfactory Condition:
- If the received item is damaged, defective, or not as described, a customer may choose to return it for a refund rather than exchange it for a replacement.
Exchange:
Product Defect:
- If the customer received a defective or damaged item but still wants the same product, they may choose an exchange. This allows them to receive a replacement without the need for a refund.
Wrong Size or Color:
- In cases where the customer ordered the wrong size or color but still wants the same product, they may choose an exchange for the correct size or color.
Preference for Another Item:
- If the customer decides they would prefer a different product altogether, they may choose to exchange the original item for the new one.
Gifts:
- In situations where the item was a gift, the recipient might prefer to exchange it for something else rather than receive a refund.
Factors Influencing the Choice:
Business Policies:
- The return and exchange policies of the business play a significant role. Some businesses have more lenient policies that allow for easy exchanges, while others may have restrictions on certain types of returns.
Customer Preferences:
- Some customers may prefer the simplicity of a refund (return) if they want to explore other options or shop elsewhere. Others may prefer the convenience of an exchange, especially if they still want a similar product.
Reason for Return:
- The specific reason for the return can influence the customer's choice. If the item is defective or not as described, the customer might lean toward an exchange. If it's a matter of personal preference, they might opt for a return.
Product Availability:
- The availability of the desired replacement item might also play a role. If the desired item is in stock, the customer is more likely to choose an exchange.
200
Learn to prioritize tasks, meet deadlines, and effectively manage your time. Demonstrating good time management skills shows employers that you can be reliable and efficient.
Time Management
200
What is the trash routine?
Trash Routine
1. Double-check to make sure you have the Dumpster Key in your possession.
2. Check to see if the trash cans in the area are full.
- If trash is under halfway full, it can be ignored for now.
3. Properly tie the trash bag closed and ensure it is secure before moving the bag.
4. Lift the bag out of the trash can, and place it into the trash gondola.
5. Immediately place a new, clean bag into the now empty trash can. Secure it properly.
6. Repeat for all trash cans in the area.
7. Once all trash cans have been emptied or the gondola is full, take the gondola to the dumpsters for deposit.
8. Unlock the dumpster gate, and place the lock in an easily visible area that is also secure while the gate is open.
9. Place all trash in the appropriate dumpster.
10. The recycling dumpster is, as it stands, reserved entirely for cardboard. ANYTHING ELSE should be placed in the trash dumpster.
11. Once the gondola has been emptied, close the dumpster gates and ensure the lock is secure in its place.
12. Return the gondola to its appropriate spot.
200
What are basic phone greetings?
Standard Greeting:
- "Thank you for calling [Your Company Name]. This is [Your Name]. How may I assist you today?"
Department-Specific Greeting:
- "Good morning/afternoon/evening. You've reached the [Department Name] at [Your Company Name]. This is [Your Name]. How may I help you?"
Extended Hours Greeting:
- "You have reached [Your Company Name]. Our office is currently closed. Our regular business hours are [mention hours]. Please leave a detailed message, and we will return your call as soon as possible. Thank you."
Direct Extension Greeting:
- "Hello, you've reached [Your Name] at [Your Company Name]. You can reach me directly at extension [Your Extension]. How can I assist you?"
Voicemail Greeting:
- "Hello, you've reached the voicemail of [Your Name] at [Your Company Name]. I'm currently away from the phone or on another line. Please leave your name, number, and a detailed message, and I will get back to you as soon as possible. Thank you."
Busy Line Greeting:
- "Thank you for calling [Your Company Name]. I'm currently assisting another caller. May I place you on a brief hold, or would you prefer to call back in a few minutes?"
Callback Greeting:
- "Thank you for calling [Your Company Name]. I'm currently away from my desk. If you leave your name, number, and a brief message, I'll be sure to return your call at my earliest convenience. Thank you."
After-Hours Greeting:
- "Thank you for calling [Your Company Name]. Our office is currently closed. If you have an urgent matter, please press [mention extension or number] to be connected to our on-call representative. Otherwise, please leave a message, and we'll get back to you during normal business hours. Thank you for your understanding."
200
What are the steps to maintaining office supply inventory?
Establish a System:
- Set up a clear and organized system for tracking office supplies. This can include using inventory management software or creating a manual system with spreadsheets.
Categorize Supplies:
- Categorize office supplies based on types, such as pens, paper, toner, cleaning supplies, etc. This makes it easier to manage and locate items when needed.
Determine Stock Levels:
- Establish minimum and maximum stock levels for each category of supplies. This helps prevent both shortages and overstock situations.
Regularly Update Inventory:
- Schedule regular updates of the inventory to reflect current stock levels. This can be done weekly, bi-weekly, or monthly, depending on the volume of supplies used.
Label Storage Areas:
- Clearly label storage areas for each type of supply. This makes it easy for employees to find and return items to the correct locations.
Centralized Storage:
- Keep all office supplies in a centralized storage area to maintain control over the inventory. This could be a dedicated supply room or storage cabinets.
Implement a Reorder System:
- Set up a system for reordering supplies when they reach the minimum stock level. This could involve creating a reorder list or using an automated system that alerts you when stock is low.
Track Usage Patterns:
- Monitor and analyze usage patterns to anticipate which supplies are frequently used and may need higher stock levels.
Emergency Supplies:
- Keep a small stock of emergency supplies for unexpected situations, such as power outages or sudden increases in demand.
300
Develop critical thinking abilities and ability to analyze and solve problems. Employers value individuals who can approach challenges creatively and find effective solutions.
Problem-Solving
300
What is our sweeping routine?
Sweeping:
- Drag the head of the broom along the ground using short, deliberate strokes.
- Hold the broom in both hands, with one hand at the top and the other near the middle, and move it from the outside of your body inward.
- Start at the room's edges and work your way toward the center.
- Draw the debris away from the baseboards and out into the open, where you can shape it into a small pile that will be easy to collect later.
- Pause periodically to clean your broom.
- Items like hair, lint, and dust bunnies have a tendency to get caught in broom bristles.
- Sweep the pile you've been forming into your dustpan for disposal.
- Once you've gone around the edges of the room, turn your attention towards coaxing the accumulated debris into your dustpan.
- Use the "drawbridge" technique to deal with dustpan lines.
- Sometimes after sweeping a pile of debris into your dustpan, you'll notice a thin line of dust left behind at the front edge. When this happens, raise the handle up at a steep angle while keeping the lip pressed firmly into the floor.
300
What are the basic parts of a computer?

300
What are the steps to using a printer?
Prepare the Document:
- Create or open the document you want to print on your computer. Ensure that the document is properly formatted and that you've made any necessary adjustments, such as selecting the correct paper size and orientation.
Check Printer Availability:
- Verify that the office printer is available, powered on, and connected to your computer. If using a network printer, ensure that your computer is connected to the correct network.
Select the Printer:
- Go to the "Print" menu or dialogue box in your software application (e.g., Microsoft Word, Adobe Acrobat). Choose the correct printer from the list of available printers. If your office has multiple printers, select the one you want to use.
Choose Print Settings:
- Adjust print settings as needed. This may include selecting the number of copies, choosing between color and black-and-white printing, setting the print quality, and specifying the paper type.
Print Preview (Optional):
- Review the print preview if available. This allows you to see how the document will look when printed and make any final adjustments before printing.
Load Paper:
- Load the appropriate type and size of paper into the printer's paper tray. Adjust any paper guides to ensure a snug fit. If the printer has multiple trays, select the one with the desired paper.
Check Toner or Ink Levels:
- Ensure that the printer has enough toner or ink to complete your print job. If the levels are low, consider replacing the toner or ink cartridge.
Print:
- Click the "Print" button to start the printing process. The printer will receive the print job and begin processing it.
Retrieve Printed Documents:
- Once the printing is complete, retrieve your printed documents from the printer's output tray. Be sure to collect all pages of your document.
Adjust Printer Settings (Optional):
- If necessary, you can adjust printer settings directly on the printer's control panel. This might include changing paper trays, selecting duplex (double-sided) printing, or adjusting other settings.
Troubleshooting (If Needed):
- If the print job encounters an issue or if the printed output is not as expected, consult the printer's user manual or follow on-screen prompts to troubleshoot the problem. Common issues include paper jams, low toner, or connectivity problems.
400
The ability to adapt to new situations, learn quickly, and embrace change is highly sought after. Being adaptable shows employers that you can handle different tasks and environments.
Adaptability
400
What is the vacuum routine?
1. Retrieve the vacuum out of the janitor closet in the yellow hallway.
2. Check the vacuum bag before use. If you need a new bag, let the facility team know.
3. Take the vacuum to the area you will be vacuuming.
4. Plug in the vacuum cord safely to the wall outlet near your work area.
5. Make sure as you vacuum, no one is walking over the vacuum card for safety reasons.
6. Turn on the power switch located on top of the vacuum body.
7. Move the vacuum in a back-and-forth motion until the flooring is clean.
8. Once finished wrap the cord back onto the vacuum hanger.
9. Store the vacuum back in the janitor closet in the yellow hallway.
400
What are the steps to mailing?
Packaging:
- Ensure that the item is properly packaged to protect it during transit. Use appropriate packaging materials such as envelopes, boxes, or padded mailers depending on the size, shape, and fragility of the item.
Labeling:
- Clearly label the package with the recipient's name, address, and any other relevant information. If your workplace uses a specific mail or shipping label, ensure it is filled out accurately and completely.
Weighing:
- Weigh the package to determine the correct postage or shipping cost. Most workplaces have access to postal scales for this purpose.
Selecting Mail or Shipping Service:
- Choose the appropriate mail or shipping service based on the delivery speed, destination, and budget. Common options include regular mail, express mail, or courier services.
Affixing Postage:
- Affix the correct amount of postage or shipping labels to the package. Make sure the postage is visible and securely attached to prevent any issues during processing.
Recording Tracking Information:
- If the mailing service includes tracking, record the tracking number. This is useful for monitoring the package's status and ensuring a smooth delivery.
Drop-off or Scheduling Pick-up:
- Depending on the workplace's policies and procedures, drop off the package at the designated mailroom post office or schedule a pick-up with a courier service.
Notifying Recipient:
- If necessary, inform the recipient that the item has been sent and provide any relevant tracking information or estimated delivery dates.
Retaining Receipt or Proof of Shipment:
- Keep the receipt or proof of shipment provided by the postal service or courier. This document may include the tracking number, postage details, and other important information.
Follow-Up and Tracking:
- If the package is sent with tracking, periodically check the tracking information to ensure the item is progressing through the delivery process. This is especially important for time-sensitive or valuable shipments.
400
How do you use a scanner?
Place the Document or Photo:
- Open the scanner lid and place the document or photo face down on the scanner bed. Align it with the edges or follow any guidelines provided on the scanner bed.
Turn On the Printer/Scanner:
- Ensure that the printer/scanner is powered on and connected to your computer or network.
Access the Scanner:
- On your computer, open the scanning software or application that is compatible with your printer. This software may be provided by the printer manufacturer or be part of your computer's operating system.
Select Scanner Settings:
- Choose the settings for your scan. This includes selecting the type of document (e.g., text, photo), color options (e.g., black and white, color), resolution (dpi), and file format (e.g., PDF, JPEG).
Preview the Scan (Optional):
- Some scanning software allows you to preview the scanned document before saving it. This can help you ensure that the placement and settings are correct.
Adjust Scan Area (if needed):
- If the scanner software allows, adjust the scan area to include only the part of the document you want to scan. This can help reduce file size and save storage space.
Start Scanning:
- Click the "Scan" or "Start" button in the scanning software to initiate the scanning process. The scanner will capture the image or document.
Review and Save the Scan:
- After the scan is complete, review the scanned image or document on your computer screen. If satisfied, save the scan to your desired location on your computer.
500
Collaborative skills are essential for success in most workplaces. Practice working effectively with others, being a good listener, and contributing to team goals.
Teamwork
500
What is the mail sort/deliver routine?
Collect and Gather:
- Begin by collecting all incoming mail from the mailbox or delivery area.
- Separate any packages or larger items from regular mail.
Initial Sorting:
- Sort mail into broad categories such as letters, packages, internal mail, and external mail.
Sort by Recipient or Department:
- Further, sort the mail based on recipients or departments. Use a system that aligns with your organization's structure.
- If your organization has a mail code system, use it to prioritize and sort mail accordingly.
Use Sorting Bins or Trays:
- Use designated sorting bins or trays for each category or department.
- Label each bin or tray clearly to avoid confusion.
Separate Outgoing and Internal Mail:
- Distinguish between outgoing mail and mail intended for internal distribution within the organization.
- Ensure that outgoing mail is properly stamped or labeled.
Verify Addresses:
- Double-check the addresses on each piece of mail to ensure accuracy.
- Correct any obvious errors or discrepancies.
Deliver or Distribute:
- Once sorted, deliver mail to the appropriate recipients or departments.
- For larger organizations, use a mail cart or trolley for efficient distribution.
Log and Track:
- If your organization uses a mail tracking system, log the receipt and distribution of each piece of mail.
- Ensure that any outgoing mail is recorded appropriately.
500
What are the steps to returning and exchanging orders?
Returns:
Initiating a Return:
- Customers initiate a return by contacting the business through various channels, such as customer service hotlines, email, or online forms. Many businesses also provide a self-service return option through their website.
Providing Information:
- Customers typically need to provide information such as the order number, item description, and reason for the return. This information helps the business process the return more efficiently.
Return Authorization:
- The business may issue a return authorization or provide a return shipping label. This ensures that the return is legitimate and helps the business track returned items.
Shipping the Item Back:
- Customers ship the item back to the business, following the provided instructions. Some businesses cover the cost of return shipping, while others may deduct the shipping cost from the refund.
Inspection:
- Upon receiving the returned item, the business inspects it to ensure that it is in a resalable condition. This includes checking for damage, missing components, or signs of use.
Refund Process:
- If the returned item meets the business's criteria, a refund is processed. The refund is issued through the original payment method, and the customer is notified of the completed return.
Exchanges:
Requesting an Exchange:
- Customers requesting an exchange follow a similar process as returns. They contact the business, provide the necessary information, and specify that they would like to exchange the item.
Exchange Authorization:
- The business may issue authorization for the exchange, providing instructions on how to return the original item and receive the replacement.
Returning the Item:
- Similar to returns, customers send the original item back to the business. Some businesses offer an advanced exchange option where they send the replacement item before receiving the returned one.
Inspection and Processing:
- The returned item is inspected, and if it meets the criteria, the replacement item is sent out. If there are additional costs for the exchanged item, the customer may be charged or refunded the difference.
Key Considerations:
Timeframe: Businesses often have a specific timeframe within which customers can initiate returns or exchanges. This timeframe varies and may be influenced by factors like the type of product or the reason for return.
Condition of the Item: The returned or exchanged item must usually be in a resalable condition unless the return is due to a defect or other issues covered by the business's policies.
Refund Methods: Refunds are typically processed through the original payment method, but some businesses may offer alternatives, such as store credit.
Communication: Clear and timely communication is crucial throughout the returns and exchanges process. Businesses should provide customers with updates on the status of their return or exchange.
500
How do you use the copy machine?
Power On the Printer:
Ensure that the printer is powered on and ready to use.
Place the Document on the Scanner Bed:
Open the scanner lid and place the document you want to copy face down on the scanner bed. Align it with the edges or follow any guidelines provided on the scanner bed.
Adjust Settings (if necessary):
On the printer's control panel or through the printer software on your computer, adjust settings such as the number of copies, color or black-and-white copying, and resolution.
Select Copy Function:
On the printer's control panel, locate the "Copy" button or access the copy function through the printer's touchscreen interface.
Choose Copy Settings:
Use the printer's control panel or software on your computer to select the desired copy settings. This may include specifying the number of copies, adjusting brightness or contrast, and choosing the paper type.
Start Copying:
Press the "Start" or "Copy" button on the printer's control panel to initiate the copying process. If you are using the printer software on your computer, there may be an option to start the copy from your computer.
Retrieve Copies:
Once the copying process is complete, retrieve the copied documents from the printer's output tray.
Adjust Additional Settings (if necessary):
If the copies do not meet your expectations or if you need to make further adjustments, you can review the copies and adjust settings accordingly for subsequent copies.